Since this week is Spring Break for me, I decided I wanted to complete a couple house projects...first up, Burlap Curtains!
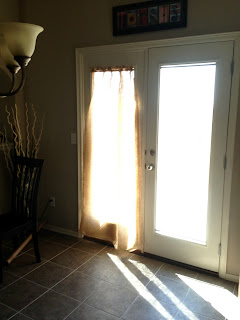
In our kitchen we have a "double door" so to speak, that lets in a lot of light. I put it in quotes because it is actually only one door, but it has the look as though it could be two. I love that it lets in lots of sunlight, however, since our house faces east, we get the west sun through our back doors so when we eat dinner, it is a little uncomfortable. It gets pretty hot in the evening, even if it's cold out because of the sun, and we usually have to move our table slightly one way so we don't have sun shining in our eyes. Here is what it originally looked like.

I didn't really have anything in particular picked out, and that's one reason it took me so long to decide on what type of curtains I wanted. I didn't want to block the sun out, but we needed something. I saw an idea on pinterest (of course) that kind of sparked my interest. They used burlap and made their own curtains, now the ones on pinterest looked nothing like what I actually wanted, but it gave me a start. So that day I went to Lowes and bought a roll of burlap, which surprisingly ended up being the perfect amount, and was only $10.
I am not really the crafty one in my family, so I made my mom come over and help me with this project.
WARNING: If you are a perfectionist, working with burlap is going to be quite a struggle!
First we laid it out and decided that we were going to use every inch because of the size of the windows, so we cut it in half since we were making two equal sized curtains.
We folded the first piece in half and we sewed a seam about 1 1/2 in. from the fold and then did that same thing again about 1 1/2 in from the seam we just stitched. That way we could slide the curtain rod through the second hole and have a little ruffle on the top.
 |
| I know, it's a little hard to see because of the sunlight. |
Now the tricky part, and the part that honestly took the most time was the bottom. Since the two ends of the burlap are located at the bottom and there isn't a nice fold, like at the top, we had to sew the two ends together before doing the same thing we did to the top. Another tricky part was making sure it was the exact length of the window. So my mom did her magic and made it happen. We did a lot of measuring and pinning, then some cutting. We then ironed it flat, so it would be easier to sew.
After about 2 hours we had the first one completed!!
Next up, the second one! - gosh it looks so easy when everything is complete and I'm just blogging about it...however, like I mentioned earlier...if you are a perfectionist, burlap might not be your favorite fabric to work with...there are absolutely no straight lines, it's also a little itchy and it has a distinct smell...I have been spraying it with smell good stuff since we got the curtains hung! Speaking of...are you ready to see the finished product?? I absolutely LOVE how they turned out!
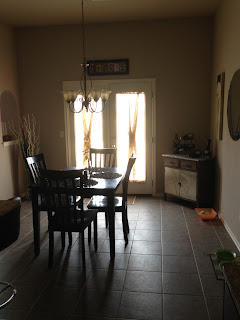 |
| Here is one during the day...I absolutely love that it still lets a lot of sun it, but it's not as direct! |
Although it was a little time consuming because the burlap was not as cooperative as we had hoped, they turned out exactly what I was wanting and I only had to spend $10!!
About 7 months later I finally added the final touch to my burlap curtains! I found these cute burlap looking flowers at Hobby Lobby and knew instantly that I had to have them! I just hot glued them and pinned them for an extra hold.
Here they are:
I absolutely love them!!!


Hermoso!!!!!!! Qué bonito cómo queda con la luz por detrás!
ReplyDeletedid you use a tension rod?
ReplyDeleteYes, on the top and bottom.
ReplyDeleteThank you for the tip about Lowe's. 8 yards for $10!! So excited!! Way cheaper than Hobby Lobby's regular price of $3.99/yd.
ReplyDeleteI never realized that Lowe's sold burlap. Oh well too late I bought my at Joanne's with a coupon so it was less than $10. How did you finish the edges or did you? I can't really tell
ReplyDeleteNo, I didn't really finish the edges. They already had a finish on them, and they have held together really well, so I didn't worry about that.
DeleteThis comment has been removed by the author.
ReplyDeleteDo you have a metal door? Our door is metal and I love this idea, but trying to find a rod to hang curtains on is becoming difficult!
ReplyDeleteThe right side which, is the actual door is metal and the left side, which is kind of a fake door is wood. I got the curtain rods at either Target or Walmart, they have little grippers on the edges, so they hold pretty well on both "doors".
DeleteA great tutorial! The finishing touch would be a jute rug under your table!
ReplyDeleteI know this post is old lol but I wanted to know, what paint color are your walls? Lol does it ever feel took dark for you or does it feel warm? We're painting our living room so I'm looking around haha :)!
ReplyDeleteSilk curtains
ReplyDeleteBuy Linen Curtains and Drapes at Affordable Prices Online from Spiffy Spools. Available in all Colors including White Linen Curtains. Order for Free Shipping Now!
to get more - https://www.spiffyspools.com/collections/custom-linen-curtains-drapes
Luxury linen bedding from 100% linen. Bedspreads, curtains, ruffle duvet covers, linen bedding sheets, linen pillowcases, table linen, and many other items.
ReplyDeletehttps://grey-moose.com/shop/curtains/